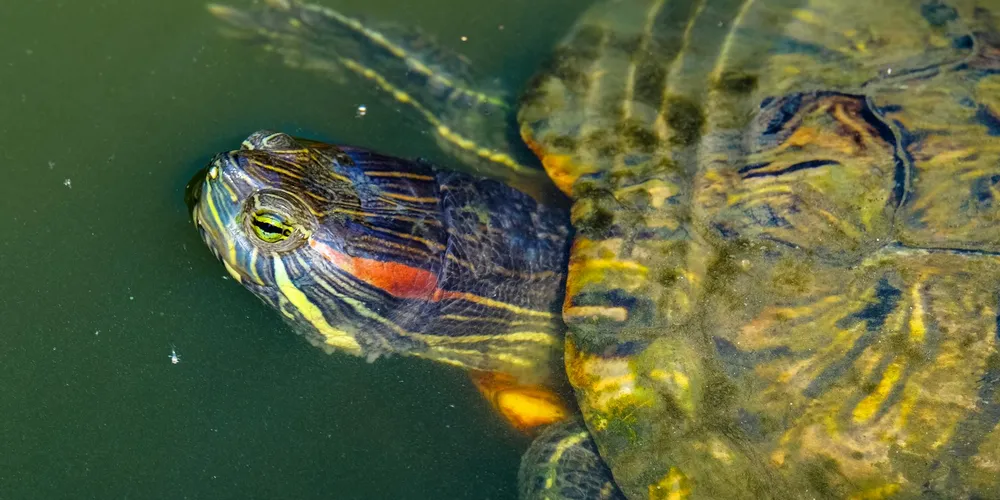
7 Deadly Turtle Tank Setup Mistakes (And How to Fix Them Fast)
Published on: November 15, 2025 | Last Updated: November 15, 2025
Written By: Matthew The
After caring for my tortoises Austen, Bronte, and Orwell, I’ve seen how easy it is to overlook small details in a tank setup that can slowly harm your turtle’s health and happiness.
We’ll explore mistakes like incorrect water temperature, poor filtration, wrong substrate, inadequate basking area, improper lighting, overfeeding, neglecting water changes, and provide fast, actionable fixes.
Why Proper Turtle Tank Setup Matters for Your Shelled Friend
Getting your turtle’s home right isn’t just about aesthetics; it’s the foundation of their health and happiness. I learned this the hard way when Bronte, my Greek tortoise, became lethargic and stopped eating after I set up her first enclosure incorrectly. The stress from an improper environment can weaken their immune system, making them vulnerable to shell rot, respiratory infections, and nutritional deficiencies.
A proper habitat does more than just prevent sickness. It provides essential enrichment, allowing for natural behaviors like basking, digging, and exploring. You’ll see a noticeable difference in their personality-more curiosity, more activity, and a brighter overall demeanor. For my box turtle Orwell, adding the right mix of substrates completely transformed him from a reserved observer to an active forager.
- Disease Prevention: Clean, correctly sized water and proper basking areas prevent fungal and bacterial growth.
- Mental Stimulation: A varied landscape with hiding spots and climbing opportunities keeps their minds sharp.
- Physical Health: Adequate space supports muscle development and prevents obesity.
- Longevity: A stress-free environment directly contributes to a longer, healthier life.
Mistakes in Tank Size and Overcrowding
One of the most common errors I see is underestimating how much room a turtle truly needs. A small tank doesn’t just look cramped; it creates a constant state of stress for your shelled friend. Think of it like living in a closet-you wouldn’t thrive, and neither will they. Overcrowding, whether with too many turtles or too much decor, compounds this problem, leading to territorial disputes and a dirty habitat.
The general rule is 10 gallons of water volume per inch of your turtle’s shell length. When I first brought Austen home, I had him in a 20-gallon tank, but as he grew, it became clear it was insufficient. His activity levels were low, and he seemed perpetually grumpy. Upgrading to a 75-gallon tank was like flipping a switch; he started swimming with purpose and basking contentedly for the first time.
Mistake: Too Small Tank or Overcrowding
Cramped spaces are a silent threat to a turtle’s well-being. Stunted growth is a real risk, as their bodies adapt to the limited space available. Poor water quality escalates quickly in a small volume, leading to ammonia spikes that can burn their eyes and skin. I once made the mistake of adding a new ornament that took up too much swimming space, and Orwell immediately showed signs of agitation by relentlessly pacing the glass.
Here is a simple guide to measuring and selecting the right tank for your turtle.
- Measure your turtle’s shell length from head to tail in a straight line.
- Multiply that length in inches by 10. This gives you the minimum gallon capacity for the water volume.
- Remember, this is for the water volume only. The total tank size should be larger to accommodate a dry basking area.
- Always choose the largest tank your space and budget allow. Your turtle will use every inch.
How to Fix It Fast
If you realize the tank is too small, you can correct it without causing your turtle undue stress. The key is to make the transition gradual and calm. For Bronte’s last upgrade, I set up the new enclosure next to the old one for a week so she could get used to it before the big move.
You will need a new, larger tank, a water conditioner, and a temporary holding bin.
- Prepare the new tank with dechlorinated water and get the filter running.
- Gently place your turtle in the temporary bin with a little water from their old tank.
- Transfer any decorations and, if possible, some of the old filter media to the new tank to kick-start the nitrogen cycle.
- Carefully introduce your turtle to their new home. Dim the lights for the first few hours to ease the transition.
- Monitor their behavior closely. It’s normal for them to be shy for a day or two as they explore their expansive new territory.
Mistakes in Water Quality and Filtration
I once noticed Bronte, my graceful Greek tortoise, moving slower than usual and showing little interest in food, which was unlike her lively self. Testing the water revealed high ammonia and nitrate levels from a clogged filter I had delayed cleaning. Poor filtration and skipped water changes quickly lead to toxic spikes in ammonia, nitrite, and nitrate, stressing your turtle’s immune system and causing health issues like shell rot or respiratory infections.
- Filter types: Canister filters handle large tanks efficiently, while internal filters suit smaller setups; always choose one rated for at least twice your tank’s water volume.
- Maintenance schedules: Perform partial water changes of 25-30% weekly, and clean filter media monthly to prevent waste buildup.
- Testing kits: Use liquid test kits for accurate readings of ammonia, nitrite, and nitrate, checking levels every week to catch problems early.
Mistake: Inadequate Filtration or Neglected Water Changes
Filters work by breaking down turtle waste through beneficial bacteria, but if they’re undersized or ignored, ammonia can soar and harm your pet’s delicate skin and organs. Skipping routine water changes allows toxins to accumulate, making the environment unsafe and increasing disease risk. Based on my experience with Austen and Orwell, a consistent routine keeps water crystal clear and turtles thriving.
- Checklist for choosing a filter: Assess your tank size, opt for a filter with high flow rate, and ensure it includes mechanical and biological filtration stages.
- Establishing a routine: Change 25% of the water weekly, use a dechlorinator to neutralize harmful chemicals, and test water hardness to maintain stable mineral levels.
How to Fix It Fast
If you suspect water issues, start by testing parameters with a reliable kit to identify any dangerous spikes. Perform an immediate partial water change of 30-50% to dilute toxins, and clean or replace filter media if it’s dirty. Upgrade to a more powerful filter if yours isn’t keeping up, and always treat new water with dechlorinator to protect your turtle’s health.
- Test water parameters for ammonia, nitrite, and nitrate using a liquid test kit.
- Perform a partial water change, replacing 30-50% of the tank water with dechlorinated water.
- Inspect and upgrade filtration if needed, ensuring it matches or exceeds your tank’s capacity.
| Parameter | Ideal Level |
|---|---|
| Ammonia | 0 ppm |
| Nitrite | 0 ppm |
| Nitrate | Below 20 ppm |
| pH | 6.5-8.0 |
Mistakes in Heating and Lighting
Getting the heating and lighting right can feel tricky, but it’s a game-changer for your turtle’s health. I learned this firsthand with Orwell, my box turtle, whose shell went from soft and dull to strong and vibrant once I nailed his setup. Turtles need a warm basking spot to regulate their body temperature and UVB light to process calcium for shell and bone strength. Without it, they can’t thrive, and you might see issues like lethargy or shell deformities.
Creating a proper environment involves a few key elements. Start by setting up a temperature gradient, so your turtle can move between warmer and cooler areas as needed. This mimics their natural habitat and prevents stress. For basking, use overhead heat lamps and UVB bulbs placed directly above the dry area. Here’s what you’ll need to get it right:
- Bulb types: Choose a heat lamp (like an incandescent bulb) for warmth and a separate UVB bulb (such as a fluorescent tube or compact bulb) for essential light exposure.
- Placement tips: Position lamps 10-12 inches above the basking spot to avoid burns and ensure even coverage.
- Monitoring tools: Use digital thermometers to track temperatures and a timer for consistent light cycles, just like I do for Orwell’s enclosure.
Mistake: Incorrect Temperature Gradient or UVB Lighting
If the temperature is too uniform or UVB lighting is missing, your turtle could face serious health risks. Metabolic bone disease is a common result, leading to soft shells, fractures, and pain that’s entirely preventable. I once saw Orwell become less active and his shell lose its luster, which was a wake-up call to fix things fast. Overheating or insufficient UVB can also cause appetite loss and weaken their immune system, making them more vulnerable to illness.
Setting up a basking area correctly is simpler than it seems. Always use overhead lighting to replicate the sun’s natural rays, as side lamps don’t provide the same benefits. Here are steps I follow to avoid common errors, based on years of caring for my turtles:
- Place the heat lamp and UVB bulb side by side over the basking spot for even exposure.
- Ensure the basking area stays between 85-90°F, with the cooler end around 70-75°F for a comfortable gradient.
- Avoid placing lamps too close; test the heat with your hand to feel if it’s warm but not scorching.
How to Fix It Fast
When you spot issues, quick adjustments can make a big difference. Start by checking lamp heights and temperatures daily to catch problems early. If the basking spot feels too hot or cold, raise or lower the lamp slightly-I do this for Orwell’s tank whenever seasons change. Regular maintenance prevents surprises and keeps your turtle happy and healthy.
Here’s a simple routine to follow for consistent results:
- Adjust lamp heights based on thermometer readings; aim for that 10-12 inch range for safety.
- Use reliable thermometers in both warm and cool zones to monitor the gradient easily.
- Replace UVB bulbs every 6-12 months, as they lose effectiveness even if they still light up.
Stick to this quick check, and you’ll see improvements in no time. Orwell’s energy and shell health rebounded fast once I made these changes, and yours can too.
Mistakes in Habitat and Enrichment
Your turtle’s home is more than a glass box with water; it’s their entire world. A thoughtfully designed habitat directly impacts their physical health and mental well-being, reducing stress and preventing common injuries. I learned this firsthand when I added a new, smooth river-rock cave for Austen; his previously shy demeanor vanished as he claimed it as his favorite napping spot.
Mistake: Unsafe Substrate or Lack of Hiding and Basking Areas
Many new keepers focus on water quality but overlook the foundation of the habitat. An unsafe floor or a barren landscape can lead to serious health issues like impaction, shell damage, and chronic stress. Small, ingestible gravel is a silent threat, and a wobbly basking platform is an accident waiting to happen.
My Greek tortoise, Bronte, taught me the value of security. Before she had proper hides, she would pace her enclosure relentlessly. Providing secure, enclosed spaces gave her the confidence to behave naturally, exploring and then retreating when she needed a break.
Common Hazards to Remove Immediately
- Small Gravel or Pebbles: These can be mistaken for food and cause life-threatening intestinal blockages.
- Sharp or Rough-Edged Decor: These scrape and damage the plastron (bottom shell) and delicate skin.
- Unstable Basking Docks: A platform that tips or sinks can drown a tired turtle.
- Tight, Enclosed Ornaments: Turtles can get stuck in small openings, leading to panic and injury.
How to Fix It Fast
You can transform a risky setup into a safe haven in a single afternoon. Start by removing any questionable decorations and substrate, then build up from a safe foundation.
For my box turtle Orwell, I use a mix of organic topsoil and sphagnum moss, which he loves to burrow into. Choosing the right materials is the fastest way to correct a dangerous environment and give your turtle immediate relief.
A Mini-Guide to Safe Habitat Materials
- Substrate: Large, smooth river rocks, sand-free soil, coconut coir, or bare-bottom tanks.
- Hiding Spots: Commercial turtle caves, half-terracotta pots, or smooth, hollow logs.
- Basking Platforms: Commercially made turtle docks with sturdy suction cups, stacked slate tiles, or floating cork bark.
- Enrichment & Plants (Turtle-Safe): Java fern, anubias, and artificial silk plants provide cover and stimulation.
Mistakes in Health and Nutrition Support
Your turtle’s vibrant health starts with what goes into their body, not just what surrounds it. I learned this the hard way when Bronte, my Greek tortoise, developed a slightly soft shell area that made my heart sink. It was a quiet wake-up call about the silent consequences of nutritional gaps.
Proper nutrition is a shield against illness. Think of calcium and vitamin D3 as the building blocks for a fortress-like shell and strong bones. Without them, metabolic bone disease can creep in, leading to deformities and a weakened state.
My personal turning point was incorporating a balanced supplement routine for Bronte. Within months, her shell regained its sturdy, golden-brown luster, and her graceful movements became more confident. It was a powerful reminder that what we provide at mealtime directly shapes their quality of life.
Mistake: Ignoring Supplements or Disease Prevention
This is one of the most common and dangerous oversights. Assuming a basic diet is “good enough” is like building a house without a foundation-it might stand for a while, but it won’t withstand the tests of time. Poor nutrition weakens their entire system, making them susceptible to shell rot, respiratory infections, and lethargy.
A dirty tank acts as a multiplier for these health risks. Unclean water and grimy tank glass become a breeding ground for bacteria and fungi that your turtle constantly ingests and inhales. Disease prevention isn’t just about medicine; it’s about consistent, proactive cleanliness.
Here is how to build a robust health support system:
- Dust their primary food with a high-quality calcium supplement without D3, 3-4 times a week.
- Provide a separate vitamin D3 supplement twice a week to ensure proper calcium absorption, especially if their UVB lighting isn’t optimal.
- Perform a partial water change and wipe down the tank glass at least once a week to remove algae and biofilm.
- Use a gravel vacuum during water changes to suck up waste trapped in the substrate.
How to Fix It Fast
If you’re worried you’ve fallen behind, don’t panic. You can start turning things around today. Immediate action can halt the progression of many common nutritional deficiencies.
First, conduct a quick health and habitat audit.
- Assess the Diet: Look at what you’re currently feeding. Is it varied? Is it mostly processed pellets? Immediately introduce fresh, dark leafy greens like dandelion greens and chopped kale.
- Add Calcium Sources: Go to your local pet store and get a cuttlebone. Drop it right in the tank; your turtle will gnaw on it as needed. This provides an immediate, self-regulating calcium source.
- Enhance Cleaning: Today, do a 25% water change and thoroughly scrub the tank glass inside and out. Remove any visible waste from the bottom of the enclosure.
To make this sustainable, adopt this simple weekly schedule:
- Monday & Thursday: Dust food with calcium supplement.
- Tuesday: Dust food with multivitamin or D3 supplement.
- Wednesday & Friday: Offer plain, fresh foods.
- Saturday: Perform partial water change and full glass cleaning.
- Daily: Spot clean any visible waste.
This routine transformed Bronte’s health and gave me peace of mind, knowing I was actively supporting her long, thoughtful life. Consistency is your greatest ally in preventing disease and ensuring your shelled friend thrives.
FAQs
How often should I perform a full tank cleaning for my turtle?
Perform a complete tank cleaning every 4-6 weeks to remove accumulated waste and prevent harmful bacteria growth. Always use a dechlorinator when refilling the tank to keep the water safe for your turtle.
What are the signs that my turtle is stressed from its environment?
Watch for behaviors like excessive hiding, lack of appetite, or constant pacing, which can indicate stress from improper tank conditions. Addressing issues like inadequate space or poor water quality quickly can help your turtle feel more secure and active.
How can I tell if my turtle’s diet is balanced and healthy?
Look for a firm shell, bright eyes, and consistent energy levels, as these are indicators of good nutrition and overall health. Offer a varied diet with leafy greens, proteins, and calcium supplements to prevent deficiencies and support longevity.
Guiding Your Turtle to a Happier Habitat
Focus on fixing tank errors like poor filtration and incorrect temperatures to keep your turtle healthy and active. My Russian tortoise Austen thrives because I prioritize clean water and proper basking spots, just as you can for your pet. Understanding turtle identification classification helps tailor care to your species. For instance, recognizing whether you have a land tortoise or aquatic turtle guides your habitat, diet, and overall routine.
Commit to ongoing education in turtle care to adapt and improve their living conditions over time. Staying informed about their needs reflects a deep respect for animal welfare and enriches your bond. This care philosophy is summarized in the Aquatic Turtles Essential Guide. For species-specific care and habitat tips, consult the guide.
Further Reading & Sources
- Aquatic Turtle Tank Setup 101: A Beginner’s Guide | Chewy
- How to Set Up a Tank for a Red-Eared Slider Turtle
- r/turtle on Reddit: New to turtles, please let me know about this tank setup
- How to Create the Perfect Turtle Tank (Avoid These Common Mistakes!) – The Turtle Hub
Matthew is a dedicated turtle enthusiast and conservationist with over 15 years of experience in reptile care. Known affectionately as "The Leatherback" among his peers, he combines his passion for turtles with a commitment to educating pet owners on responsible turtle care and environmental stewardship.
Equipment Maintenance